
We already explored PowerPoint’s embedded animations in 3D objects. Yes, these embedded animations are only available in 3D objects within the Online 3D Models dialog box, but there is so much more you can do with these animations. Did you know that you can turn off the 3D animations? Or limit the number of times that the objects animate? Or did you know that some objects have more than one embedded 3D animated Scene, so that you can choose the Scene you want? We will explore all these options within this post.
Explore Multiple Scenes (Embedded Animations)
Some 3D models have multiple embedded animations, known within PowerPoint as Scenes. In the last tutorial, we looked at the Toaster 3D model that had just one Scene. However, the 3D model for Saturn, shown in Figure 1, below has three Scenes!

Figure 1: Saturn 3D Model in PowerPoint
So how do you know where you can discover these extra Scenes? You can find them in both the 3D Model Tools Format and the Animations tabs of the Ribbon. Make sure your 3D model is selected on the slide before you start looking for the extra Scenes!
Within the contextual 3D Model Tools Format tab of the Ribbon, you will find the Scenes button. Click this button to bring up a gallery with all embedded animations, as shown in Figure 2, below.
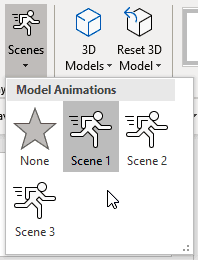
Figure 2: Scenes within the 3D Model Tools Format tab
You will notice that there are 3 Scenes available for the Saturn 3D model. The default Scene that PowerPoint applies is typically Scene 1. Also, do notice that there is a None option, which when clicked, will turn off all Scenes, and will make your 3D model, behave like any other 3D model, without any embedded animations.
As mentioned earlier, these extra Scenes can also be found within the Animations tab of the Ribbon, as can be seen in Figure 3, below.

Figure 3: Scenes within the Animations tab
Do note that the options highlighted in red are the Scenes, the ones highlighted in blue are the 3D animations, and the ones thereafter, highlighted in orange are the typical PowerPoint animations such as Entrance, Emphasis, and Exit.
Turn off Scenes (Embedded Animations)
You can turn off Scenes by simply clicking the None option, shown in both Figures 2 and 3, previously on this page.
Limit Animation Repeats
Most users like these Scenes, but let’s face it: if you have an animated 3D object on a slide that keeps animating itself all the time, you might as well have no hopes left from gaining any attention from your audience!
The first time your audience sees the bread slide pop out of the toaster, they might find that act cute, but you cannot expect them to see that same scene a hundred times. So, how do you prevent the toast from popping off, or any other animation from playing more than a few times?
To do so, follow these steps:
- Select your 3D object on the slide, and access the Animations tab of the Ribbon. Click the Animation Pane button, if it is not already selected, as shown in Figure 4, below.

Figure 4: Animation Pane button- Doing so brings up the Animation Pane, typically on the right side of your PowerPoint interface, as can be seen in Figure 5, below.
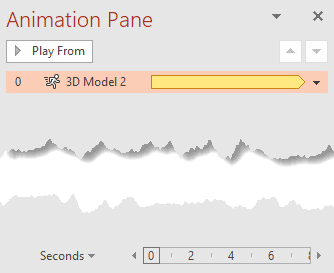
Figure 5: Animation Pane- You will see an animation within the Animation Pane that represents the Scene. Since we have only one animation on this slide, it’s easy to identify, but even if you have many animation events, you’ll see the name contains the words, “3D Model”.
- Double-click the animation to bring up the Scene dialog box that you see in Figure 6, below. This dialog box has multiple tabs. Select the Timing tab.
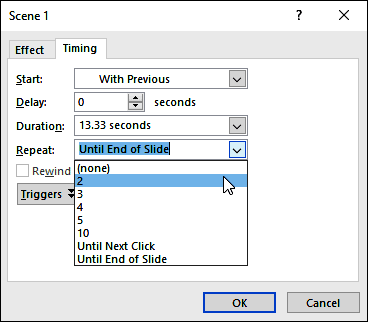
Figure 6: Timing tab of the Scene dialog box- Click the Repeat option to bring up a drop-down list. By default, the Until End of Slide option is selected, but you can choose any other option. You can also type in your own number to limit the repetition of the animation. Click OK when done.
In this post, we learned that embedded 3D animations in PowerPoint are easy to use, and they are also very powerful. There are options which may at first not be so obvious, but once you play with them, you will be able to make the Scenes work exactly as you need.
